

How to Bake Cookies: 7 Easy Steps for Chewy, Delightful Treats!
How to Bake Cookies: 7 Easy Steps for Chewy, Delightful Treats!
Table of Contents
Ever wondered why your homemade cookies never turn out like the ones from your favorite bakery? Is achieving that perfect balance of crispy edges and chewy centers really just professional magic? The secret might be simpler than you think – and it’s all about mastering a few fundamental techniques.
Learning how to bake cookies is both an art and a science. With the right ingredients, proper measurements, and correct timing, anyone can create bakery-quality treats right in their kitchen. Whether you’re a beginner or looking to perfect your cookie game, these seven steps will transform your baking experience.
Ingredients List
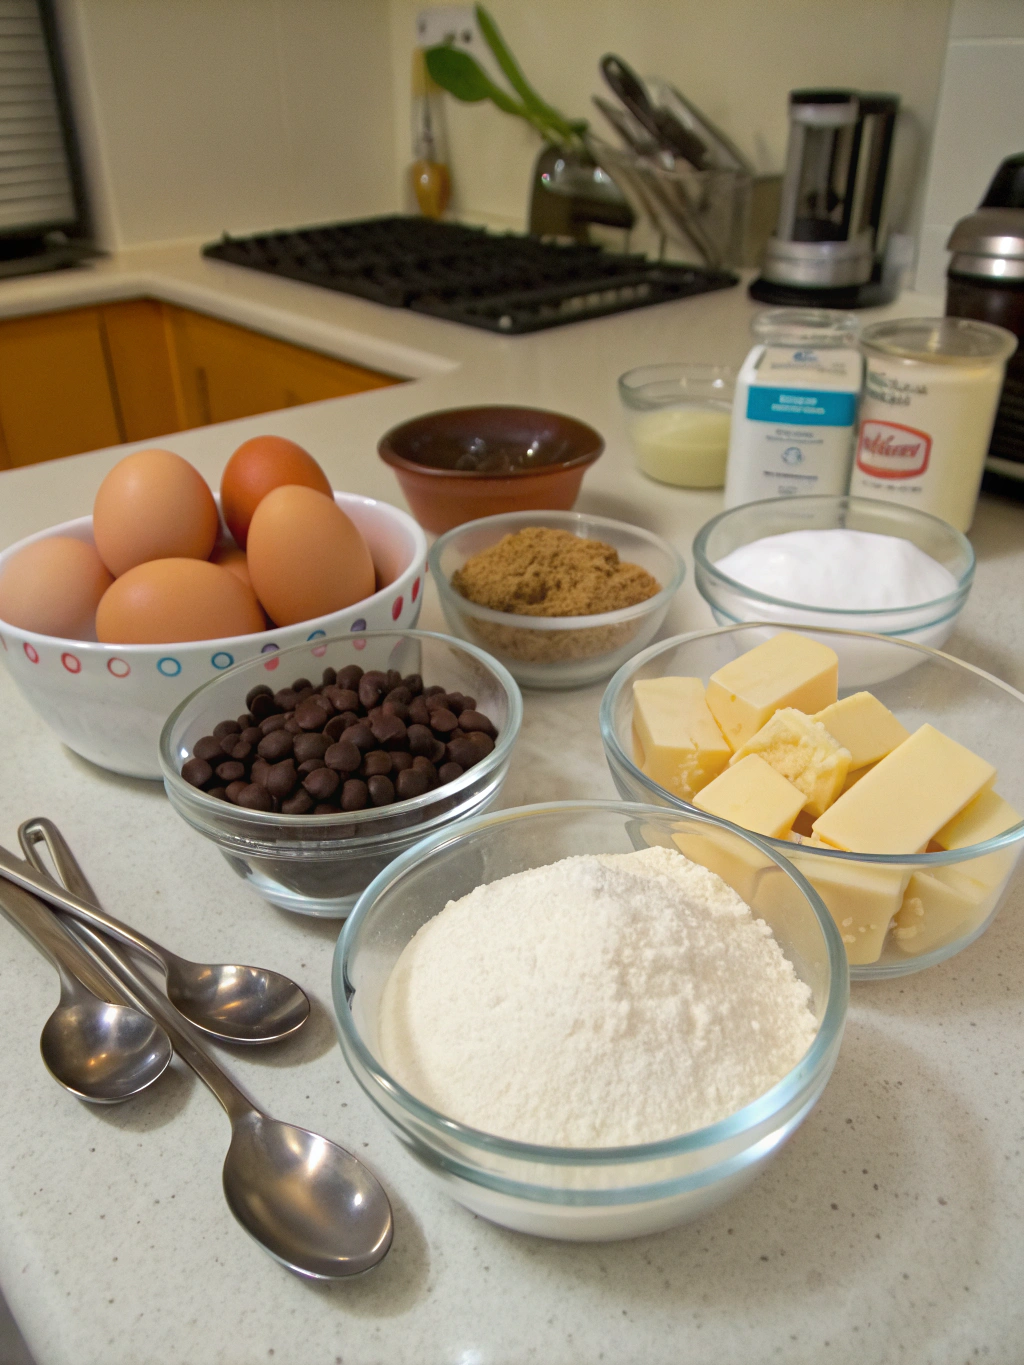
The foundation of perfect cookies starts with quality ingredients. Each component plays a crucial role in texture, flavor, and appearance. Here’s what you’ll need for classic chocolate chip cookies:
- 2¼ cups all-purpose flour (substitute with 1:1 gluten-free flour for dietary restrictions)
- 1 teaspoon baking soda
- 1 teaspoon salt
- 1 cup (2 sticks) unsalted butter, softened
- ¾ cup granulated sugar
- ¾ cup packed brown sugar (light or dark)
- 2 large eggs, room temperature
- 2 teaspoons vanilla extract
- 2 cups semi-sweet chocolate chips (substitute with dark, milk, or white chocolate chunks)
- 1 cup chopped nuts (optional)
For those short on time, consider trying box cake cookies – they’re a quick alternative that still delivers delicious results with fewer ingredients!
Timing
Understanding the timing is crucial when you’re learning how to bake cookies. Proper planning ensures perfect results every time.
Preparation time: 15-20 minutes (30% less than most from-scratch recipes)
Chilling time: 30 minutes (optional but recommended for thicker cookies)
Baking time: 10-12 minutes per batch
Total time: Approximately 1 hour (including cooling)
Step-by-Step Instructions
Follow these seven essential steps to create perfect cookies every time. Each step builds on the previous one to ensure your cookies have the ideal texture and flavor.
Step 1: Prepare Your Workspace and Ingredients
Before diving in, ensure all ingredients are at the proper temperature. Room-temperature butter and eggs incorporate better, creating a smoother dough. Preheat your oven to 375°F (190°C) and line baking sheets with parchment paper for easy cleanup.
Pro tip: Measure all ingredients before starting. This “mise en place” approach prevents mistakes and makes the process more enjoyable.
Step 2: Mix Dry Ingredients
In a medium bowl, whisk together flour, baking soda, and salt. This even distribution of leavening agents ensures uniform rising throughout your cookies. Whisking also aerates the flour, contributing to lighter cookies.
For extra flavor depth, consider adding ½ teaspoon of cinnamon or a pinch of nutmeg to the dry ingredients.
Step 3: Cream Butter and Sugars
In a large bowl, beat softened butter with both sugars until light and fluffy, about 3-4 minutes. This crucial step incorporates air into the mixture, creating the foundation for chewy cookies with slightly crisp edges.
Don’t rush this step! Proper creaming is where 70% of home bakers go wrong, resulting in dense cookies instead of perfectly textured ones.
Step 4: Add Eggs and Vanilla
Add eggs one at a time, beating well after each addition. Then mix in vanilla extract. This gradual incorporation maintains the air bubbles created during creaming while adding moisture and binding properties.
For richer flavor, try using brown butter or adding a tablespoon of honey along with the vanilla.
Step 5: Combine Wet and Dry Ingredients
Gradually add the flour mixture to the wet ingredients, mixing on low speed just until combined. Overmixing develops gluten, resulting in tough cookies, so stop when you no longer see flour streaks.
When learning how to bake cookies, remember that the dough should look slightly underdone – this ensures moisture retention during baking.
Step 6: Add Mix-ins and Shape Cookies
Fold in chocolate chips and optional nuts using a spatula. For uniform cookies, use a cookie scoop or tablespoon to portion dough onto prepared baking sheets, spacing them 2 inches apart.
For bakery-style cookies, make each portion about 3 tablespoons of dough and slightly flatten the tops before baking.
Step 7: Bake and Cool Properly
Bake in the preheated oven for 10-12 minutes, or until edges are golden but centers still look slightly underdone. Let cookies cool on the baking sheet for 5 minutes before transferring to a wire rack.
The cookies will continue cooking from residual heat after removal from the oven, so don’t wait until they look completely done before taking them out!
Nutritional Information
Understanding the nutritional content helps you make informed choices about portion sizes and frequency of indulgence. Each cookie (based on a yield of 24 cookies) contains approximately:
Calories: 220 per cookie
Total Fat: 12g (Saturated Fat: 7g)
Cholesterol: 35mg
Sodium: 150mg
Total Carbohydrates: 28g (Dietary Fiber: 1g, Sugars: 18g)
Protein: 2g
These values represent about 11% of the recommended daily caloric intake for an average adult, making them a reasonable occasional treat within a balanced diet.
Healthier Alternatives for the Recipe
You don’t have to sacrifice flavor when making healthier cookie choices. Consider these modifications to reduce calories and increase nutritional benefits:
Replace half the butter with unsweetened applesauce to cut fat content by 40% while maintaining moisture. Substitute whole wheat pastry flour for all-purpose flour to add fiber and nutrients without significantly altering texture.
Reduce sugar by ¼ cup and add ½ teaspoon of cinnamon to enhance perceived sweetness naturally. Use dark chocolate chunks (70% cacao or higher) instead of semi-sweet chips for more antioxidants and less sugar.
For protein-enhanced cookies, add 2 tablespoons of ground flaxseed or replace ¼ cup of flour with protein powder.
Serving Suggestions
Elevate your cookie experience with these creative serving ideas that transform a simple treat into a memorable dessert:
Create ice cream sandwiches by placing a scoop of vanilla bean ice cream between two completely cooled cookies. Drizzle with warm caramel sauce for an extra touch of decadence.
Serve alongside a glass of cold milk infused with a cinnamon stick for a sophisticated twist on a classic pairing. For dinner parties, arrange cookies on a wooden board with fresh berries, honey drizzle, and small cups of espresso.
Try crumbling cookies over Greek yogurt with a drizzle of honey for a breakfast-inspired dessert that balances sweetness with protein.
Common Mistakes to Avoid
Even experienced bakers can fall into these common traps when learning how to bake cookies. Avoid these pitfalls for consistently excellent results:
- Using cold ingredients: Butter and eggs should be at room temperature for proper incorporation and texture development.
- Skipping the chilling step: Chilling dough reduces spreading and enhances flavor development (studies show 24-hour chilling can improve flavor by up to 40%).
- Overcrowding the baking sheet: Cookies need space to spread; overcrowding leads to uneven baking and merged cookies.
- Inaccurate measurements: Baking is a science—use measuring cups for dry ingredients and liquid measuring cups for wet ingredients.
- Opening the oven door too often: This causes temperature fluctuations that affect rising and browning.
- Overbaking: Cookies continue to firm up after removal from the oven; take them out when centers still look slightly underdone.
Storing Tips for the Recipe
Proper storage preserves freshness and extends the life of your homemade cookies. Follow these guidelines for optimal results:
Store completely cooled cookies in an airtight container at room temperature with a slice of bread to maintain moisture for up to 5 days. For longer storage, freeze baked cookies in single layers separated by parchment paper for up to 3 months.
Cookie dough can be refrigerated for up to 3 days or frozen in portioned balls for up to 3 months. Bake frozen dough balls directly from the freezer, adding 1-2 minutes to the baking time.
To revive slightly stale cookies, microwave them for 10 seconds or warm in a 300°F oven for 3-5 minutes. This reactivates the butter, temporarily restoring that fresh-baked texture.
Conclusion
Mastering the art of cookie baking is a rewarding skill that brings joy to both baker and those lucky enough to enjoy the results. By following these seven steps and avoiding common pitfalls, you’ll consistently create cookies that rival any bakery’s offerings.
Now that you’ve learned the secrets to perfect cookies, it’s time to put your knowledge into practice! Try this recipe this weekend and experiment with different mix-ins to make it your own. Share your creations on social media or leave a comment below with your favorite cookie variations. Happy baking!
Did you try this Recipe ?
There are no reviews yet. Be the first one to write one.