
Oreo Dirt Pudding Recipe – No-Bake Chocolate Layered Dessert
Table of Contents
Introduction
Have you ever wondered if it’s possible to create a dessert that’s both delightfully indulgent and embarrassingly easy to make? Well, wonder no more! This Oreo dirt pudding is a creamy, crunchy, no-bake dessert that comes together in minutes and is always a crowd favorite. With layers of rich chocolate pudding and crumbly Oreo cookies, this treat is as fun to look at as it is to eat. Perfect for any occasion, from potlucks to birthday parties, or just because you deserve something sweet. Ready to get started? Let’s dig into making this scrumptious Oreo dirt pudding!
Ingredients List
Here’s what you’ll need to create this mouthwatering dessert:
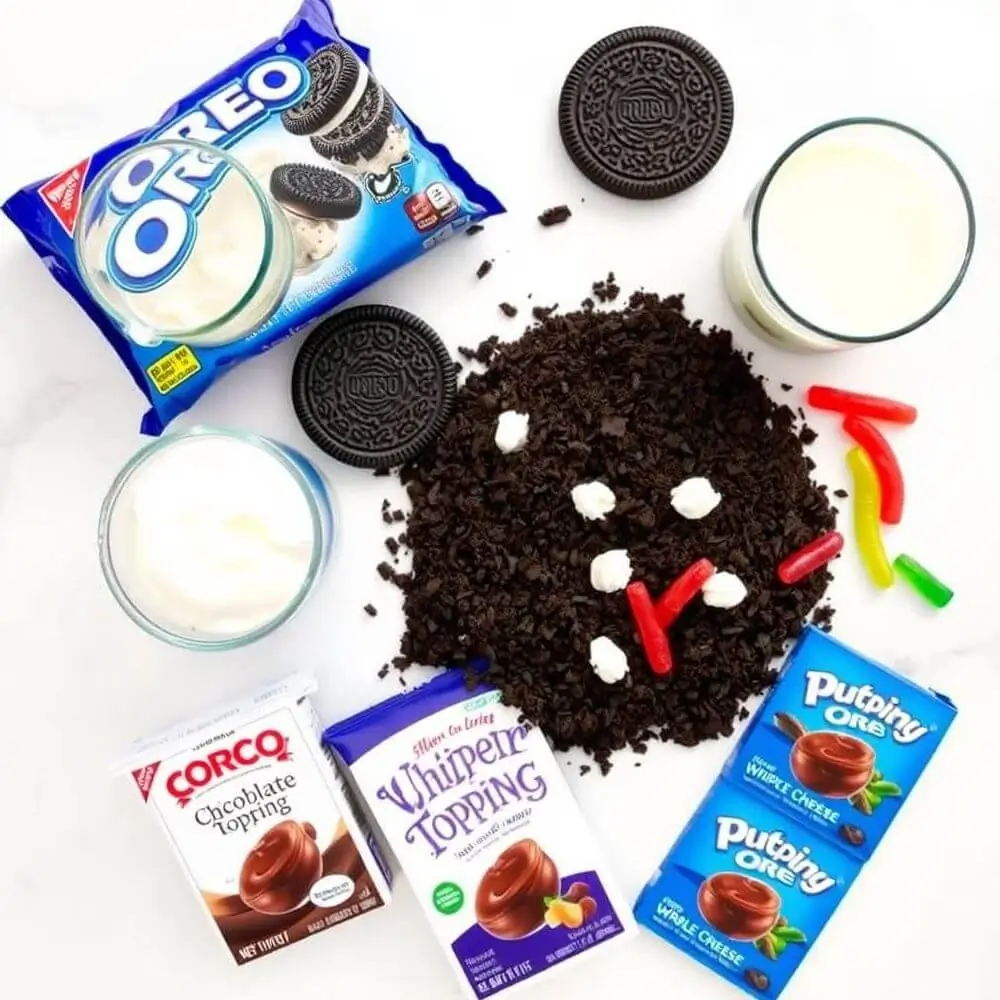
- Oreo Cookies: 36 Oreo cookies (or any chocolate sandwich cookies), crushed. Either pulse the cookies in a food processor or seal them in a zippered bag and crush with a rolling pin.
- Butter: 2 tablespoons, melted (optional, to bind the crust).
- Cream Cheese: 8 ounces, softened to room temperature.
- Powdered Sugar: 1 cup.
- Milk: 3 ½ cups, divided. Whole milk is recommended for the creamiest texture.
- Instant Chocolate Pudding Mix: 2 (3.9-ounce) boxes.
- Whipped Topping: 16 ounces (like Cool Whip), thawed in the refrigerator.
- Gummy Worms: A handful, for decoration (optional, but makes it even more fun!).
Substitutions and Variations:
- Dairy-Free/Vegan: Use dairy-free Oreos, plant-based cream cheese, milk, and whipped topping. Just be sure the pudding mix is vegan-friendly (or use a homemade chocolate pudding recipe).
- Gluten-Free: Opt for gluten-free chocolate sandwich cookies.
- Lower Sugar: Use sugar-free Oreos, pudding mix, and whipped topping. You can also reduce the powdered sugar to ¾ cup.
Timing
- Prep Time: 15 minutes
- Chill Time: At least 2 hours (or overnight)
- Total Time: 15 minutes active, 2+ hours inactive
Compared to other layered desserts, this Oreo dirt takes 20% less time to prepare since there’s no baking involved!
Step-by-Step Instructions
Step 1: Prepare the Crust (Optional)
- If using a crust, combine the crushed Oreos and melted butter in a medium bowl.
- Press the mixture into the bottom of a 9×13-inch baking dish or a similar serving dish.
Tip: If you prefer a loose “dirt” texture, skip the crust and reserve all the crumbs for layering.
Step 2: Make the Cream Cheese Layer
- Use a hand mixer to whip the room-temperature cream cheese in a large bowl until it’s creamy and smooth.
- Slowly incorporate the powdered sugar into the cream cheese mixture, mixing until fully blended.
- Add ½ cup of milk and beat until the mixture is smooth and creamy. Set aside.
Step 3: Make the Chocolate Pudding Layer
- In a separate bowl, combine the instant chocolate pudding mix with the remaining 3 cups of milk.Whisk until the pudding thickens and becomes smooth, which should take around 2 minutes.
- Let the pudding sit for 5 minutes to set slightly.
Step 4: Assemble the Layers
- Carefully fold the whipped topping into the cream cheese blend until the mixture is uniform.
- Layer half of the whipped cream cheese mixture over the crust (or directly into the serving dish if skipping the crust).
- Sprinkle half of the remaining crushed Oreos evenly over the cream cheese layer.
- Spread all the chocolate pudding over the Oreo layer.
- Top with the remaining whipped cream cheese mixture and sprinkle the remaining crushed Oreos on top.
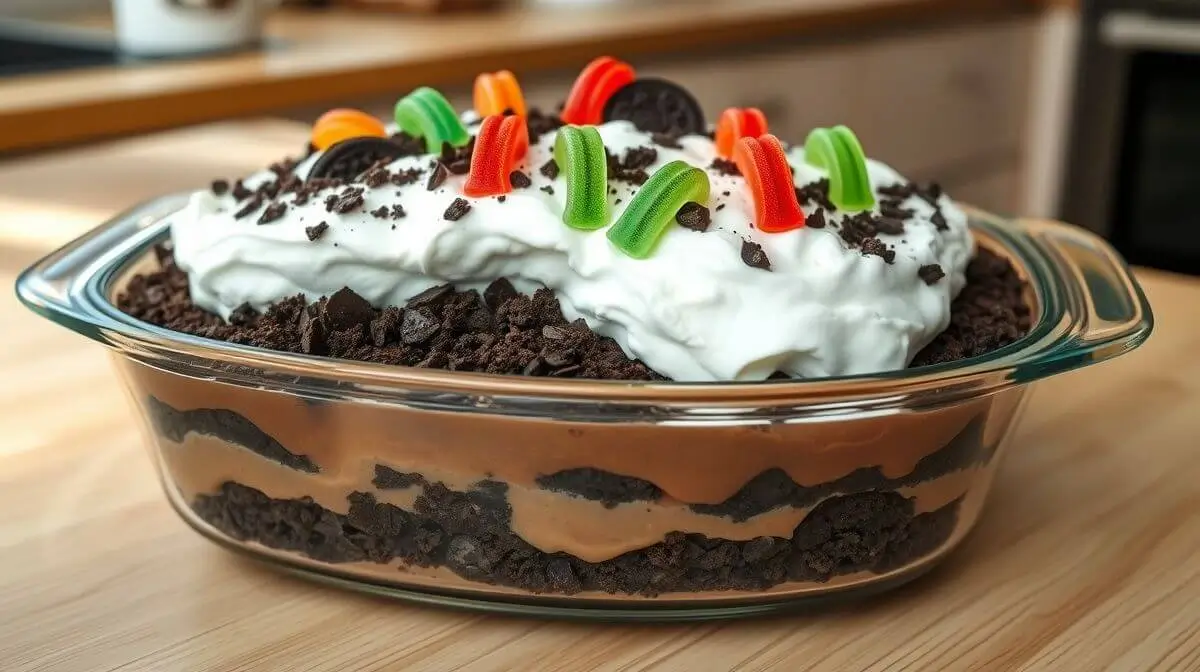
- Decorate with gummy worms or other candy of your choice.
Step 5: Chill and Serve
- Wrap the dish in plastic and chill it in the fridge for a minimum of 2 hours—or overnight—for the best set.
- Serve chilled, scooping out portions to enjoy the delicious layers!
Nutritional Information
Here’s the nutritional breakdown for one serving (assuming 12 servings per 9×13-inch dish):
- Calories: 495 kcal
- Carbohydrates: 71 g
- Protein: 6 g
- Fat: 22 g
- Saturated Fat: 12 g
- Trans Fat: 0.2 g
- Cholesterol: 26 mg
- Sodium: 590 mg
- Potassium: 279 mg
- Fiber: 2 g
- Sugar: 54 g
- Vitamin A: 343 IU
- Calcium: 141 mg
- Iron: 3 mg
Note: These values are approximate and can vary based on ingredient brands and modifications.
Healthier Alternatives for the Recipe
Lighter Version:
- Opt for lighter ingredients like low-fat cream cheese, skim milk, and reduced-calorie whipped topping.
- Choose sugar-free pudding mix and Oreo Thins.
- Substitute the powdered sugar with a natural sweetener and reduce the quantity to ¾ cup.
Higher Protein Version:
- Mix 1 scoop of chocolate protein powder into the pudding layer.
- Use Greek yogurt as a partial substitute for whipped topping.
Vegan and Allergy-Friendly:
- Use plant-based ingredients as listed in the Substitutions section.
- Ensure all products are free of allergens (e.g., nuts, soy, gluten) if needed.
Serving Suggestions
- Garnish Ideas: Top with crushed mint leaves, chocolate shavings, or fresh berries.
- Portion Control: Serve in individual cups or mason jars for a cute presentation.
- Add Texture: Add a layer of crushed nuts (like almonds or pecans) between the pudding and cream cheese layers.
- Themed Occasions: Make this for a kids’ party with gummy insects and toy shovels for a “digging in the dirt” experience.
Common Mistakes to Avoid
- Using Cold Cream Cheese: Soften the cream cheese to room temperature to avoid lumps in the mixture.
- Skimping on Chill Time: The dessert needs time to set, so make sure it chills for at least 2 hours.
- Overmixing: When folding in the whipped topping, mix gently to maintain a fluffy texture.
- Hardened Crust: If making a crust, do not press too hard, or it will become difficult to scoop.
Storing Tips for the Recipe
- Refrigeration: Cover tightly and store in the refrigerator for up to 3 days.
- Freezing: It’s not recommended to freeze the assembled dessert, as the texture can change upon thawing.
- Make-Ahead: You can prepare the layers up to 24 hours in advance and assemble just before serving.
- Component Storage: Prepare the crushed Oreos, cream cheese mixture, and pudding separately and combine when ready to serve for the best texture.
Conclusion
This Oreo dirt is a guaranteed hit, no matter the occasion! Its layers of creamy, chocolatey goodness and satisfying crunch make it an irresistible no-bake dessert. Plus, with its straightforward preparation, you can whip it up in minutes and let the fridge do the rest of the work. So grab your spoons and get ready to enjoy this playful yet delicious treat!
Call to Action: Have you tried making this recipe? Share your experience and photos with us in the comments below! And for more easy dessert ideas, check out our other no-bake recipes.
FAQs
Q: Is it possible to substitute instant pudding with a homemade chocolate version?
A: Absolutely! You can substitute homemade chocolate pudding. Just make sure it’s chilled and thickened before layering.
Q: Can I make this in individual servings?
A: Yes! Layer the ingredients in cups or mason jars for a fun, portable option. Perfect for parties!
Q: Can I use a different type of cookie?
A: Certainly! Try it with golden Oreos or gluten-free chocolate cookies if you prefer.
Q: How do I keep the gummy worms from sinking into the layers?
A: Add them right before serving, or push them slightly into the top layer so they stay put.
Q: Can I make this without whipped topping?
A: Yes, use freshly whipped cream instead. Just whip 2 cups of heavy cream with 2 tablespoons of sugar and fold it into the cream cheese mixture.
Did you try this Recipe ?
There are no reviews yet. Be the first one to write one.