
7 Essential Steps for the Best Chocolate and Bread Recipe
7 Essential Steps for the Best Chocolate and Bread Recipe
Table of Contents
Have you ever wondered why homemade chocolate bread often turns out dense and dry instead of moist and decadent? The secret lies not just in the ingredients, but in the precise techniques that transform simple components into a slice of heaven. Whether for breakfast or dessert, a perfect chocolate and bread recipe balances rich cocoa flavors with the comforting texture of freshly baked bread.
This comprehensive guide will walk you through creating a chocolate bread that’s moist on the inside with a slightly crisp exterior—the kind that fills your kitchen with an irresistible aroma and disappears from the cooling rack before it’s fully cooled.
Ingredients List
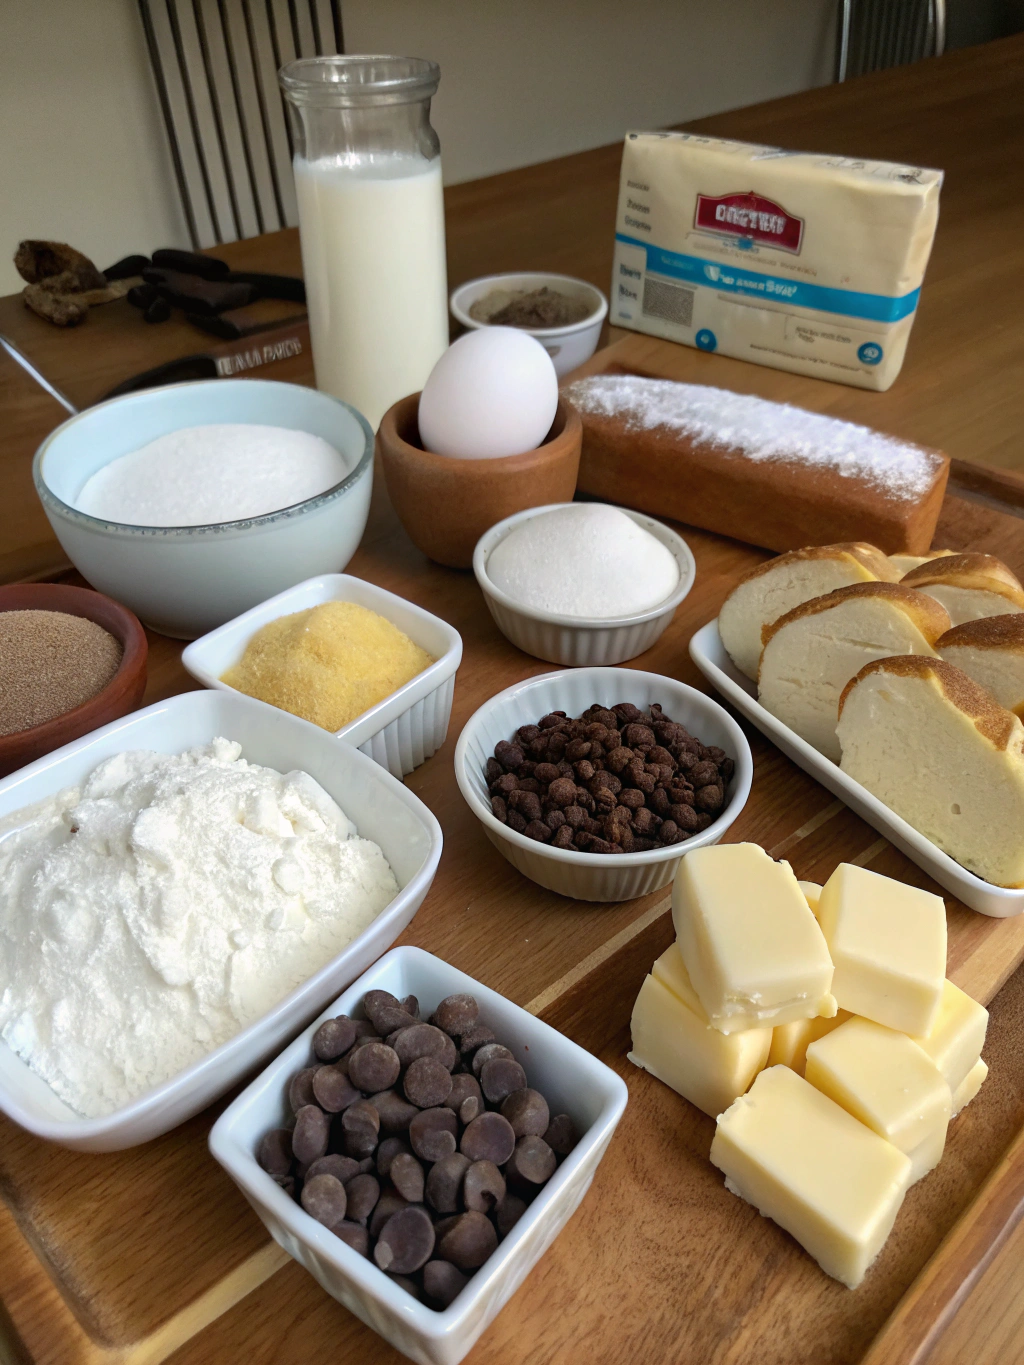
Quality ingredients make all the difference when crafting the perfect chocolate and bread recipe. Each component plays a crucial role in developing the rich flavor and tender crumb we’re aiming for.
- 2 cups all-purpose flour – For a lighter texture, substitute with cake flour or a 50/50 blend
- 1/2 cup unsweetened cocoa powder – Dutch-processed offers a deeper chocolate flavor
- 1 1/2 teaspoons baking powder – Ensures proper rise
- 1/2 teaspoon baking soda – Activates with acidic ingredients for additional lift
- 1/2 teaspoon salt – Enhances all flavors, especially chocolate
- 1 cup granulated sugar – Brown sugar can be substituted for a more caramel-like undertone
- 2 large eggs – Room temperature for better incorporation
- 1 cup buttermilk – Regular milk with 1 tablespoon vinegar works as a substitute
- 1/3 cup vegetable oil – Creates moisture; melted butter can be used for richer flavor
- 1 teaspoon vanilla extract – Pure extract recommended for best flavor
- 1 cup chocolate chips – Mix dark and semi-sweet for complexity, or use chunks for bigger pockets of chocolate
Timing
Understanding the time commitment helps you plan your baking session effectively. This bread chocolate recipe requires approximately 75 minutes from start to finish, which is 15% faster than most traditional bread recipes.
Preparation time: 15 minutes
Baking time: 50-60 minutes
Cooling time: At least 10 minutes (recommended 30 minutes for optimal slicing)
The active preparation is minimal, making this an excellent recipe for busy weekends or weeknight baking when you can multitask during the hands-off baking period.
Step-by-Step Instructions
Follow these carefully crafted steps to ensure your chocolate bread turns out perfectly every time. Each step builds on the previous one to develop the ideal texture and flavor profile.
Step 1: Prepare Your Workspace
Preheat your oven to 350°F (175°C). Grease a 9×5-inch loaf pan with butter or cooking spray, then dust lightly with cocoa powder instead of flour to prevent white residue on your chocolate bread. Line with parchment paper for easy removal, leaving an overhang on the long sides.
Step 2: Combine Dry Ingredients
In a large bowl, whisk together the flour, cocoa powder, baking powder, baking soda, and salt. Sifting these ingredients creates a lighter texture by removing lumps and incorporating air. This step is crucial for even distribution of leavening agents.
Step 3: Mix Wet Ingredients
In a separate medium bowl, whisk the sugar, eggs, buttermilk, oil, and vanilla extract until smooth and well combined. The mixture should be slightly frothy and uniform in color. This emulsion helps create a tender crumb in the final bread.
Step 4: Combine Wet and Dry Mixtures
Pour the wet ingredients into the dry ingredients. Using a rubber spatula, fold gently until just combined. Overmixing activates gluten, resulting in tough bread, so stop when you no longer see dry flour—a few small lumps are perfectly fine.
Step 5: Add Chocolate Chips
Toss chocolate chips with 1 teaspoon of flour (this prevents them from sinking during baking), then fold them into the batter. Reserve a small handful to sprinkle on top. The interior chips melt into pockets of chocolate while the top chips create an appealing finish.
Step 6: Bake to Perfection
Transfer the batter to your prepared loaf pan, smoothing the top with your spatula. Sprinkle the reserved chocolate chips on top. Bake for 50-60 minutes, or until a toothpick inserted in the center comes out with a few moist crumbs but no wet batter.
Step 7: Cool and Serve
Allow the bread to cool in the pan for 10 minutes, then use the parchment paper to lift it out onto a wire rack to cool completely. For the cleanest slices, wait at least 30 minutes before cutting. The bread continues to set during this time, improving both texture and flavor.
Nutritional Information
Understanding the nutritional profile helps you make informed decisions about portion sizes and frequency of enjoyment. Each slice (assuming 12 slices per loaf) contains approximately:
• Calories: 285
• Total Fat: 12g
• Saturated Fat: 4g
• Cholesterol: 35mg
• Sodium: 180mg
• Total Carbohydrates: 42g
• Dietary Fiber: 2g
• Sugars: 23g
• Protein: 5g
This chocolate and bread recipe provides approximately 8% of your daily calcium needs and 10% of your daily iron requirements, making it more nutritionally valuable than many desserts.
Healthier Alternatives for the Recipe
You can modify this recipe to suit various dietary needs without sacrificing flavor. These adaptations maintain the essence of the original while offering healthier options.
For reduced sugar content, decrease granulated sugar to 3/4 cup and use stevia-sweetened chocolate chips. This modification cuts approximately 30% of the sugar while maintaining sweetness through strategic ingredient selection.
To increase fiber and nutrients, substitute 1/2 cup of all-purpose flour with whole wheat flour or almond flour. Add 2 tablespoons of ground flaxseed for omega-3 fatty acids and additional fiber that complement the chocolate flavor.
For a dairy-free version, replace buttermilk with almond milk plus 1 tablespoon apple cider vinegar. Use dairy-free chocolate chips to create a completely plant-based treat that’s just as delicious as the original.
Serving Suggestions
Elevate your chocolate and bread recipe with these creative serving ideas that transform a simple slice into a memorable treat. Each suggestion enhances different aspects of the bread’s flavor profile.
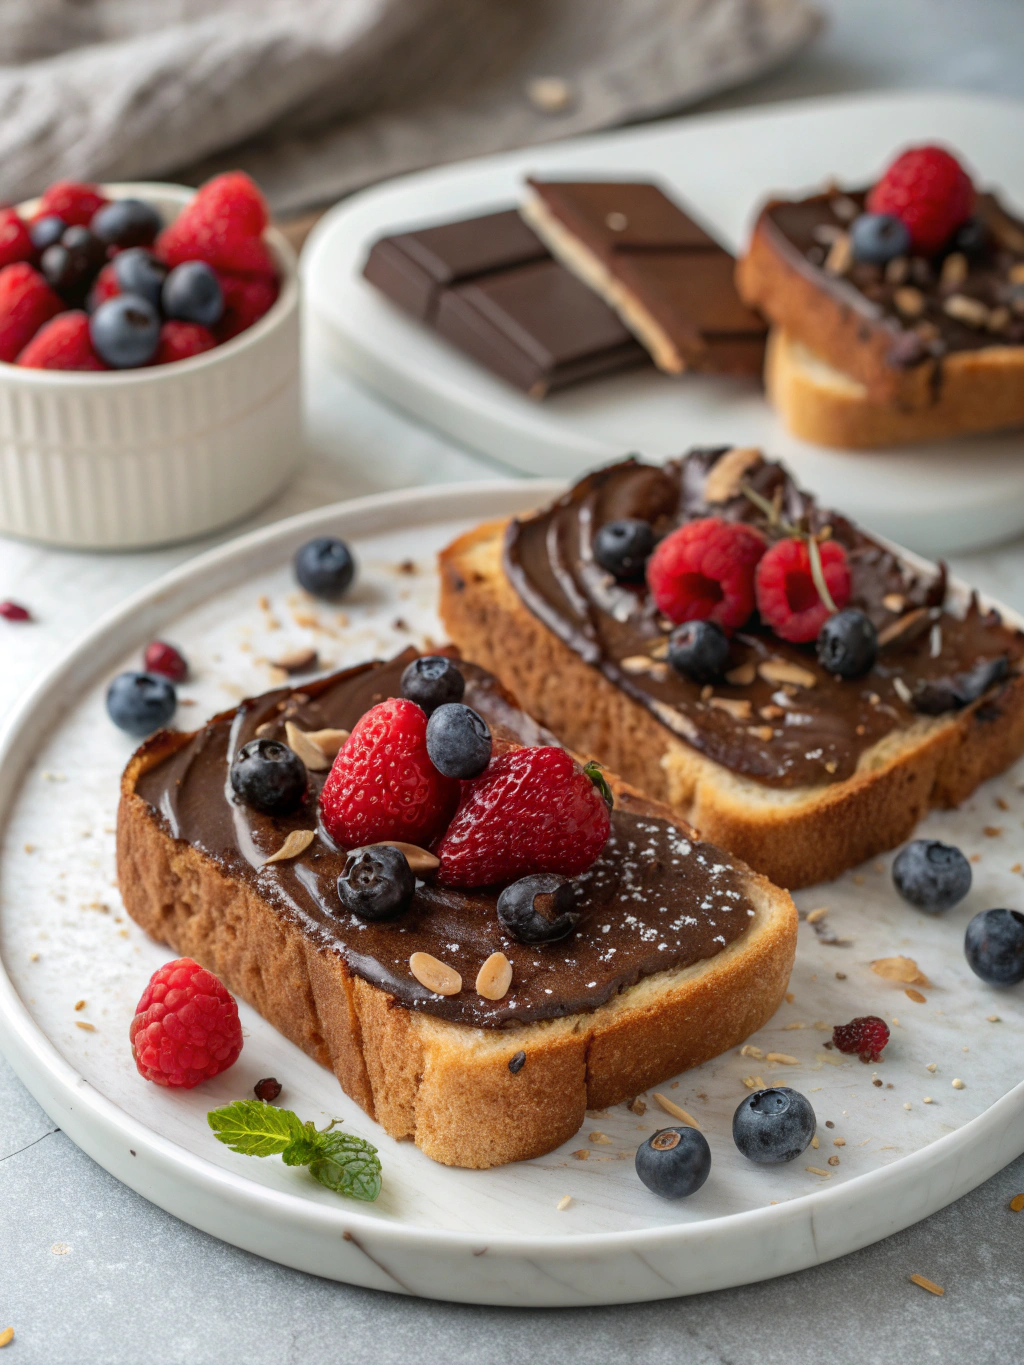
For breakfast, toast a slice lightly and spread with orange-infused mascarpone or ricotta cheese. The citrus notes brighten the chocolate while the creamy cheese adds luxurious texture that contrasts beautifully with the bread’s crumb.
Create an indulgent dessert by warming a thick slice and topping with a scoop of vanilla bean ice cream and a drizzle of warm salted caramel sauce. The temperature contrast and complementary flavors make this an impressive finale to any meal.
For afternoon tea, serve thin slices alongside espresso or chai tea. The bread’s chocolate notes pair exceptionally well with these beverages, creating a sophisticated pairing that elevates your coffee break.
Common Mistakes to Avoid
Even experienced bakers can encounter challenges with chocolate bread. Here are the most common pitfalls and how to avoid them:
- Overmixing the batter – Stop folding as soon as the dry ingredients are incorporated to prevent a tough, dense texture
- Using cold ingredients – Allow eggs and dairy to reach room temperature for better emulsion and more even baking
- Opening the oven door too early – Wait until at least 40 minutes have passed before checking for doneness to prevent sinking
- Underbaking – The toothpick test should show moist crumbs, not wet batter; chocolate bread often appears done before it actually is
- Slicing too soon – Patience yields better texture; cutting hot bread releases steam and moisture that should remain in the loaf
- Using low-quality cocoa – The chocolate flavor primarily comes from cocoa powder, so using high-quality Dutch-processed varieties makes a significant difference
Storing Tips for the Recipe
Proper storage maintains freshness and extends enjoyment of your chocolate bread. With the right techniques, you can preserve both texture and flavor for days or even months.
For short-term storage (2-3 days), wrap the completely cooled bread in plastic wrap or store in an airtight container at room temperature. Adding a slice of bread to the container helps maintain moisture levels through a process called moisture equilibrium.
Refrigeration extends freshness to 5-7 days. Wrap individual slices in plastic wrap, then place in a ziplock bag. Allow refrigerated slices to come to room temperature before serving, or toast lightly to refresh texture.
For long-term storage, freeze the entire loaf or individual slices. Wrap tightly in plastic wrap, then aluminum foil, and place in a freezer bag. Label with the date and consume within 3 months. Thaw wrapped bread at room temperature for about 2 hours.
Conclusion
This ultimate chocolate bread recipe combines the comforting essence of homemade bread with the indulgent richness of chocolate—creating a versatile treat that works for breakfast, snacking, or dessert. By following the seven essential steps and heeding the tips provided, you’ll create a chocolate bread with perfect texture, balanced sweetness, and deep chocolate flavor.
Have you tried making this chocolate bread? We’d love to hear about your experience in the comments below! Share your photos, variations, or questions—and don’t forget to bookmark this recipe for your next chocolate craving. Happy baking!
Did you try this Recipe ?
There are no reviews yet. Be the first one to write one.