
Protein Cookie Recipe: 7 Tips for Chewy, Muscle-Fueling Treats!
Protein Cookie Recipe: 7 Tips for Chewy, Muscle-Fueling Treats!
Table of Contents
Ever wondered why your protein cookies turn out dry and crumbly instead of soft and chewy? The secret lies not just in the ingredients, but in the precise techniques that transform ordinary cookies into protein-packed powerhouses that actually taste delicious.
Creating the perfect protein cookie recipe requires balancing nutrition with taste – a challenge many fitness enthusiasts face. Today, I’m sharing my ultimate guide to baking protein cookies that will satisfy your sweet tooth while supporting your fitness goals.
After testing dozens of variations and methods, I’ve perfected a formula that delivers consistent results every time. These cookies pack a protein punch without sacrificing the chewy texture we all crave.
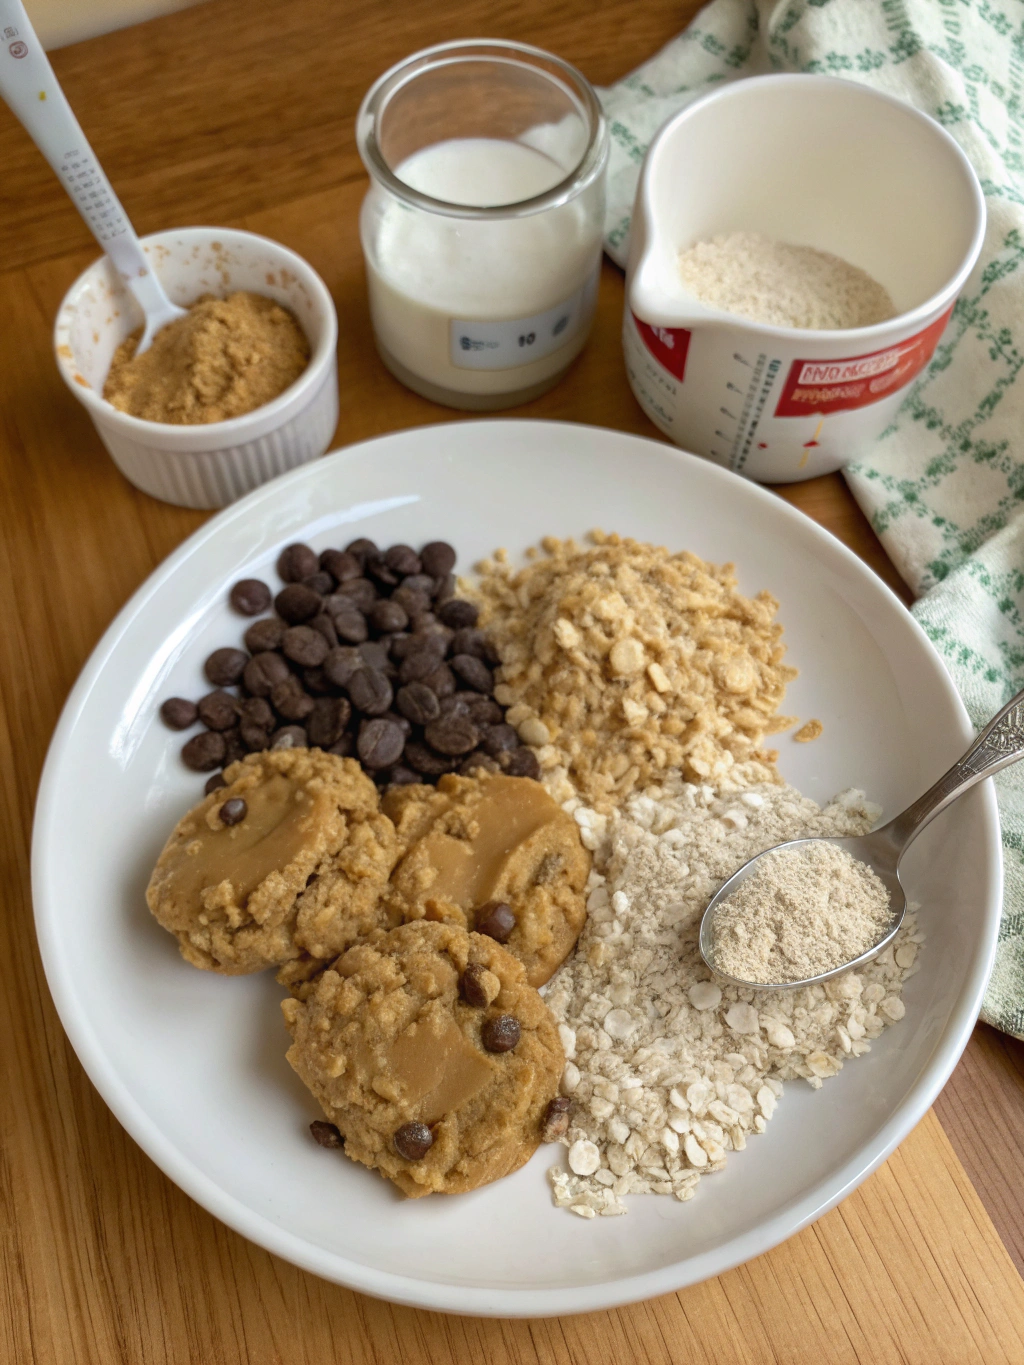
Ingredients List
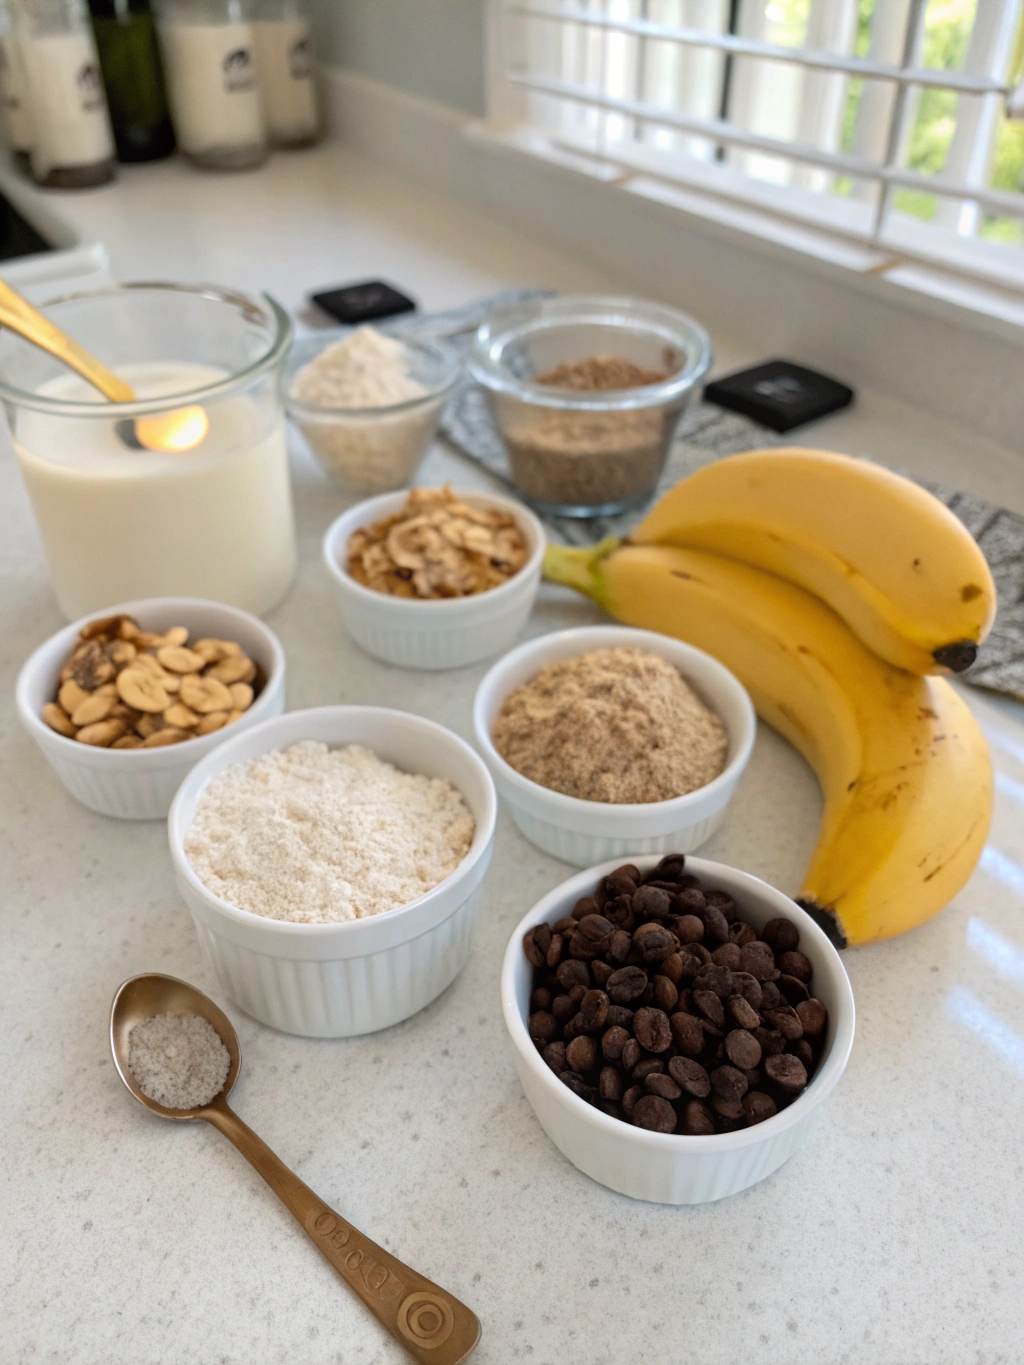
The foundation of any great protein cookie recipe starts with quality ingredients. Each component plays a crucial role in texture, flavor, and nutritional profile.
- 1 cup almond flour (substitute: oat flour for nut allergies)
- 2 scoops (60g) vanilla whey protein powder (substitute: plant-based protein for vegan option)
- 1/3 cup coconut sugar (substitute: monk fruit sweetener for lower carbs)
- 1/4 cup cottage cheese cookies (adds moisture and protein; substitute: Greek yogurt)
- 3 tablespoons natural peanut butter (substitute: almond or sunflower butter)
- 1 large egg (substitute: flax egg for vegan option)
- 1 teaspoon vanilla extract
- 1/2 teaspoon baking soda
- 1/4 teaspoon salt
- 1/3 cup dark chocolate chips (substitute: cacao nibs for lower sugar)
- 2 tablespoons milk (any variety) – only if needed for consistency
Timing
Preparation time: 15 minutes – perfect for fitting into your busy pre-workout routine.
Chilling time: 30 minutes (essential for preventing spread and enhancing texture)
Baking time: 8-10 minutes – 40% faster than traditional cookies, making them ideal for quick meal prep.
Total time: 55 minutes, with only 25 minutes of active work – efficiency that fitness enthusiasts will appreciate.
Step-by-Step Instructions
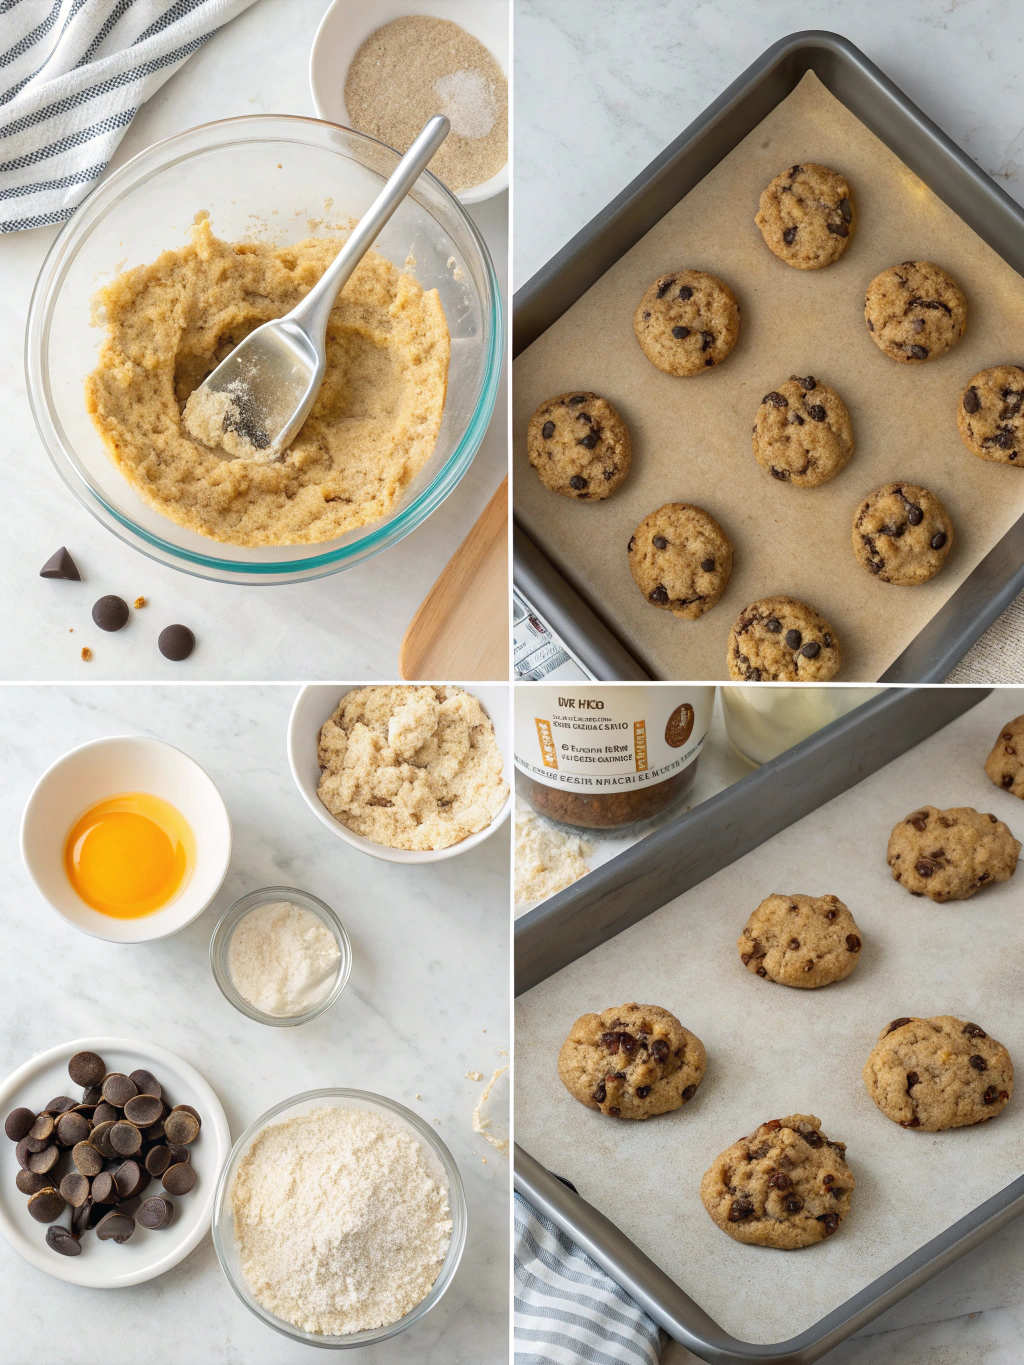
Step 1: Prepare Your Protein Base
In a large mixing bowl, whisk together the almond flour, protein powder, baking soda, and salt. This creates an evenly distributed dry mixture, preventing protein powder clumps that can lead to dry spots in your finished cookies.
Step 2: Create the Moisture Matrix
In a separate bowl, mix the cottage cheese, peanut butter, egg, vanilla extract, and coconut sugar until smooth. The cottage cheese is my secret weapon – it adds protein while keeping the cookies moist for days longer than traditional recipes.
Step 3: Combine Wet and Dry Ingredients
Gradually fold the wet ingredients into the dry mixture, being careful not to overmix. Stop when just combined – overmixing activates gluten (even in gluten-free flours) and leads to tough cookies. The consistency should be like thick cookie dough, not runny batter.
Step 4: Add Mix-ins
Gently fold in chocolate chips. For variety, try adding chopped nuts, dried fruit, or even protein granola for extra crunch. This is where you can customize your protein cookie recipe to match your flavor preferences.
Step 5: Chill the Dough
Cover the bowl and refrigerate for 30 minutes. This critical step allows the flour to hydrate fully and the fats to solidify, resulting in cookies that spread properly during baking rather than flattening too quickly.
Step 6: Shape and Bake
Preheat your oven to 350°F (175°C). Line a baking sheet with parchment paper. Scoop 2-tablespoon portions of dough and roll into balls. Slightly flatten each ball with your palm – they should be about 1/2 inch thick.
Step 7: Perfect the Baking Process
Bake for 8-10 minutes until edges are set but centers still look slightly underdone. This is crucial – protein cookies continue cooking after removal from the oven. Let them cool on the baking sheet for 5 minutes before transferring to a wire rack.
Nutritional Information
Each cookie (recipe makes 12) provides impressive macros that support muscle recovery and growth:
• Calories: 165
• Protein: 9g (36% more protein than standard cookies)
• Carbohydrates: 12g (7g net carbs)
• Fiber: 5g
• Fats: 9g (mostly healthy unsaturated fats)
• Sugar: 6g (60% less than traditional cookies)
The balanced macronutrient profile makes these cookies ideal for post-workout recovery or as a protein-boosting snack. The moderate carb content provides energy without spiking blood sugar levels dramatically.
Healthier Alternatives for the Recipe
Customize this protein cookie recipe to match your specific dietary needs without sacrificing flavor:
For keto dieters: Replace coconut sugar with erythritol or monk fruit sweetener and use sugar-free chocolate chips to reduce net carbs to under 4g per cookie.
For higher protein content: Add 1 tablespoon of unflavored collagen peptides to boost protein without affecting taste or texture. This simple addition increases protein content by 15% per cookie.
For dairy-free options: Substitute the cottage cheese with coconut yogurt and use plant-based protein powder. This maintains moisture while eliminating dairy completely.
Serving Suggestions
Transform these protein cookies from simple snacks to satisfying mini-meals with these creative serving ideas:
Protein Ice Cream Sandwich: Place a scoop of protein ice cream between two cookies for a post-workout treat that delivers both fast and slow-digesting proteins.
Breakfast Cookie Parfait: Crumble a cookie over Greek yogurt and berries for a protein-packed breakfast that satisfies sweet cravings while providing sustained energy.
Pre-Workout Stack: Pair a cookie with a small banana 30-45 minutes before training for an optimal blend of protein and carbohydrates that fuels performance.
Common Mistakes to Avoid
- Using too much protein powder: Exceeding the recommended amount creates dry, chalky cookies. Stick to the 60g measurement for optimal texture.
- Skipping the chilling step: This results in cookies that spread too thin and become crispy rather than chewy. The 30-minute chill is non-negotiable for perfect texture.
- Overbaking: Protein cookies firm up significantly after cooling. Remove them when they still look slightly underdone for the perfect chewy center.
- Using cold ingredients: Cold eggs and cottage cheese don’t incorporate properly. Let them reach room temperature for 15 minutes before mixing.
- Substituting ingredients without adjusting moisture: Different protein powders absorb liquid differently. Be prepared to add 1-2 tablespoons of milk if your dough seems dry.
Storing Tips for the Recipe
Maximize freshness and convenience with these storage strategies:
Counter storage: Keep in an airtight container at room temperature for up to 3 days. Place a slice of bread in the container to maintain moisture – the cookies will absorb humidity from the bread rather than drying out.
Refrigeration: Store in the refrigerator for up to 7 days. The cold environment actually improves the chewy texture of protein cookies, unlike regular cookies which harden when refrigerated.
Freezing: These cookies freeze exceptionally well for up to 3 months. Wrap individually in parchment paper, then place in a freezer bag. Thaw at room temperature for 30 minutes or microwave for 15-20 seconds for an instant protein-rich treat.
Conclusion
Mastering this protein cookie recipe gives you more than just a delicious treat – it provides a versatile template for creating nutrient-dense snacks that support your fitness goals without sacrificing flavor or texture.
The combination of quality proteins, healthy fats, and moderate carbohydrates makes these cookies perfect for fueling workouts, supporting recovery, or simply satisfying cravings in a more nutritious way.
Have you tried making protein cookies before? What challenges did you face? Share your experience in the comments below, or tag me in your cookie creations on social media! And if you’re looking for more protein-packed desserts, check out my collection of fitness-friendly treats that make healthy eating enjoyable.
Did you try this Recipe ?
There are no reviews yet. Be the first one to write one.